A Guide to Customizing with WebTESS report cards
In today’s digital-first educational landscape, student report cards are more than just a summary of grades—they’re a reflection of your school’s identity, values, and commitment to clear communication with parents and guardians. Enter WebTESS, the robust web-based Student Information System (SIS) from Harts Systems Ltd, designed to streamline school administration while offering powerful tools for customization. With WebTESS, educators and administrators can transform standard report cards into visually engaging documents featuring your school’s logo, custom graphics, and designer borders, all without needing advanced design software.
Whether you’re managing a K-12 public school, private institution, or international academy, WebTESS’s modular design makes it easy to tailor reports to your exact needs. In this blog post, we’ll walk you through the step-by-step process of creating custom report cards that not only convey academic progress but also reinforce your school’s brand. Let’s dive in!
What is WebTESS and Why Customize Report Cards?
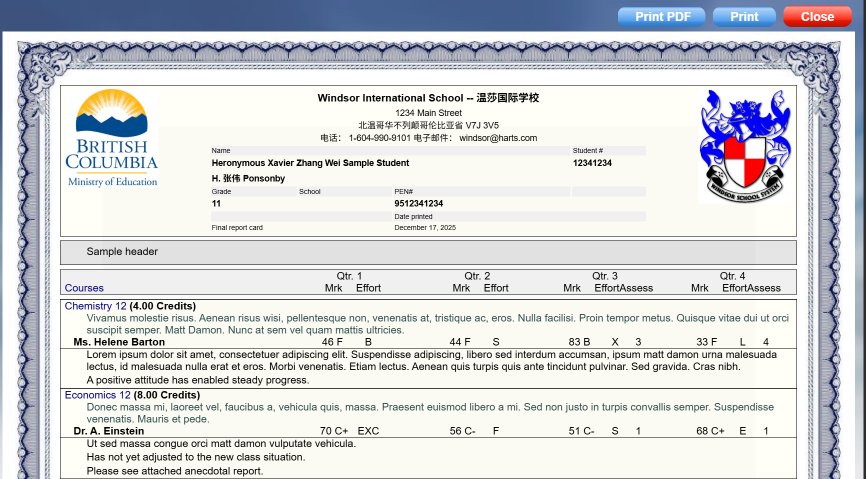
WebTESS is a comprehensive SIS that handles everything from student enrollment and attendance to grading and parent portals. One of its standout features is the built-in reporting module, which supports customizable report cards and transcripts. By incorporating your school’s logo, graphics (like icons for achievements or motivational elements), and designer borders, you can make these documents more professional and memorable.
Customization benefits include:
- Branding Consistency: Embed your logo to build trust and familiarity.
- Visual Appeal: Add graphics and borders to make reports less intimidating and more engaging for families.
- Efficiency: Generate reports in bulk, with personalized touches, saving hours of manual design work.
Step 1: Accessing the Report Card Customization Tools
- Log In to WebTESS: Open your web browser and navigate to your school’s WebTESS login page. Enter your credentials to access the admin dashboard.
- Navigate to the Reporting Module: From the main menu, select Grades> Setup > Setup Report Cards. This opens the Report Card Designer interface, a user-friendly tool for building and editing templates.
Step 2: Adding Your School Logo
Your school’s logo is the cornerstone of branding—let’s make it prominent.
- Prepare Your Logo File: Ensure your logo is in a high-resolution format like PNG (with transparent background) or JPEG. Aim for 300 DPI to avoid pixelation when printing.
- Upload the Logo: In WebTess, go to Utilities, Upload images and Student photos. Choose “Other images” and click Choose Files to upload your logo files.
- After the images are uploaded, return to Grades > Setup > Setup Report cards, click the Graphics tab. Select your logo from the drop-down list and position in the top-left, top-right, or bottom-right.
WebTESS automatically scales images for digital or print output, ensuring crisp results across devices.
Step 3: Incorporating Graphics for Engagement
- Access Border Options: In the Border tab, select a border style from the drop-down list.
- Choose Styles: WebTESS offers preset borders—simple lines, ornate patterns, or even custom uploads (e.g., a wavy vine border for an eco-focused school). Select thickness, color (match your brand palette), and style (solid, dashed, or decorative).
- When you select the border, it will be displayed in the Preview window. You can adjust the size of the border to fit your style.
Wrapping Up: Make Every Report Card a Masterpiece
With WebTESS, creating custom report cards isn’t just possible—it’s straightforward and empowering. By weaving in your school logo, thoughtful graphics, and elegant borders, you’re not only communicating grades but also celebrating your community’s spirit. This level of personalization can boost parent engagement and student pride, turning a routine task into a meaningful tradition.