Setting Up Tomcat for SSL – Part 2
Create keystore file and generate a SSL certificate request:
Now that you have added this folder to the Path, it is easier to use the keytool program to create a keystore file and generate a SSL certificate request.
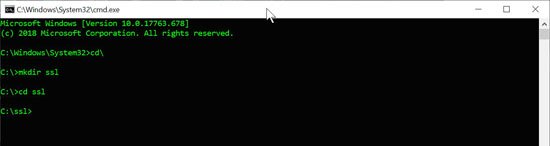
Click the Windows button and run the CMD.EXE (command line) program
Then create a folder where you will save the keystore file, along with the various certificate files. For example: C:\SSL\
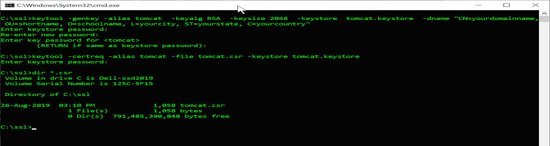
1. Now start by creating the keystore file using this command:
-keystore tomcat.keystore
-dname “CN=yourdomainname, OU=shortname, O=schoolname, L=yourcity,
ST=yourstate, C=yourcountry”
In this example, change “yourdomainname” to the domain name you are using for your web-site. Change shortname to a short abbreviation for your school or company name. Change schoolname to your school name or company name. Change yourcity, yourstate, yourcountry to your location.
When you run this command, it will ask for a password – enter a new password, then re-enter the password, then press RETURN for the key password. Write down the password somewhere safe – you will need it! This will create a file called tomcat.keystore which will contain your certificate request, and also eventually contain your SSL certificate.
2. Next, generate the certificate request file:
When you run this command, you will have to enter your password used in the previous command. This will create a file tomcat.csr – this is a plain text file containing the certificate request, which you will send to the SSL provider. Usually the SSL provider will then verify your domain by sending an email to the admin email of your domain name. Check with your network administrator to make sure you have an email account.
3. Once your SSL provider has verified your domain, they will send you the certificate.
This usually consists of 1 file, containing 2 parts, or 2 separate files. The separate files should contain the “root” certificate and the “intermediate” certificate. If you get only 1 file, it will contain both parts, which you can edit using Notepad and split into the 2 separate parts and then save as 2 separate files.
Once you have the files, save them into the c:\ssl folder where the keystore file is located, and name them tomcat-crt.txt and tomcat-intermed.txt
4. Now you can import the files into your keystore file as follows:
Start with the intermediate file:
-file tomcat-intermed.txt
And then the root file:
-file tomcat-crt.txt
5. If all goes well, your tomcat.keystore file now contains the completed SSL certificate.
Configuring Tomcat to use the SSL:
On your web-server, you will need to locate the server.xml file which is usually found in C:\Program Files (x86)\Apache\Tomcat\conf
The server.xml is a plain text file which you can open with Notepad
Look through the file and find the section for
Then, replace that section with this:
protocol=”org.apache.coyote.http11.Http11Protocol”
minSpareThreads=”5″
maxSpareThreads=”75″
enableLookups=”true”
disableUploadTimeout=”true”
acceptCount=”100″
maxThreads=”200″
scheme=”https”
secure=”true”
SSLEnabled=”true”
keystoreFile=”[c:\ssl\tomcat.keystore]”
keystorePass=”[yourpassword]”
clientAuth=”false”
sslProtocol=”TLS” />
Make sure you use the same password that you used when you created the keystore file.
Save the changes. And then stop/restart the Tomcat service on the server.
The SSL certificate should now be installed and functional. You can verify this by using the https://yourdomainname address in a web-browser and see that it shows a secure connection.